Postman Guide for Beginners: A Comprehensive Introduction to API Testing and Collaboration.


Postman is one of the most popular tools for API testing, with its cool user interface and powerful features that allow developers to create, test, and manage APIs easily.
This comprehensive Postman guide is designed for beginners who are just starting with API testing and collaboration.
It covers the basics of APIs and HTTP requests. Whether you are a developer, tester, or project manager, this guide will provide you with the knowledge and skills to create and manage APIs effectively using Postman.
Postman and its Features
Postman is a user-friendly API testing tool that allows developers to easily create, test, and manage APIs.
With Postman, users can make HTTP requests and test responses and write scripts to automate their testing.
The tool also includes features like
Collections,
Environments,
Variables,
Mock server,
Monitors,
Flows
History
Getting Started with Postman
Installing Postman
Workspace
Collections
Adding a new request to collections
Create a new request
Making HTTP requests using Postman
Understanding the response
Installation
Installing Postman is a simple process that can be completed in the following steps:
Visit postman.com/downloads and click the Download button.
Select your operating system (Windows, Mac, or Linux) and click the "Download" button.
Once the download is complete, run the Postman installer file.
Follow the on-screen instructions to complete the installation process. You may need to accept the terms of service and choose a destination folder for the installation.
Once the installation is complete, you can launch Postman by double-clicking on the desktop icon or searching for it in your applications folder.
You can also use Postman online, so you won't need to install it. You only need to register with postman.
Workspace
A Workspace is a collaborative environment where developers and teams can organize, create, and manage their API projects.
It provides a centralized hub for all API development activities, including creating and sharing collections, documenting APIs, testing and debugging requests, and collaborating with team members.
Workspaces also offer a range of tools and features that help developers streamline their API workflows, such as version control, role-based access, and integrations with other development tools.
- Create a workspace
First, log in to your Postman account.
Once logged in, click on the "Workspace" button in the top-left corner of the Postman app.

Click the "Create a Workspace" button in the Workspace panel.
Enter a name and summary, and choose the visibility of your new workspace (Personal, Private, Team, Partner, Public). The visibility will determine whether you work alone or with others.
Once you've created your Workspace, you can start adding collections, APIs, and other resources by clicking on the "New" button in the app's top-left corner and selecting the type of resource you want to add.

You can also customize your Workspace settings, such as adding tags or setting up roles and permissions for team members.
To switch between different Workspaces, click the Workspace button in the app's top-left corner and select the Workspace you want to work on.
Collections
A Collection is a group of API requests saved together for easy access and sharing. It is a powerful tool for developers and testers to organize and manage API workflows.
With a Postman Collection, users can create and organize requests, save requests as collections, and share collections with team members.
- Create a collection
Click the Collections in the application's top left-hand corner.
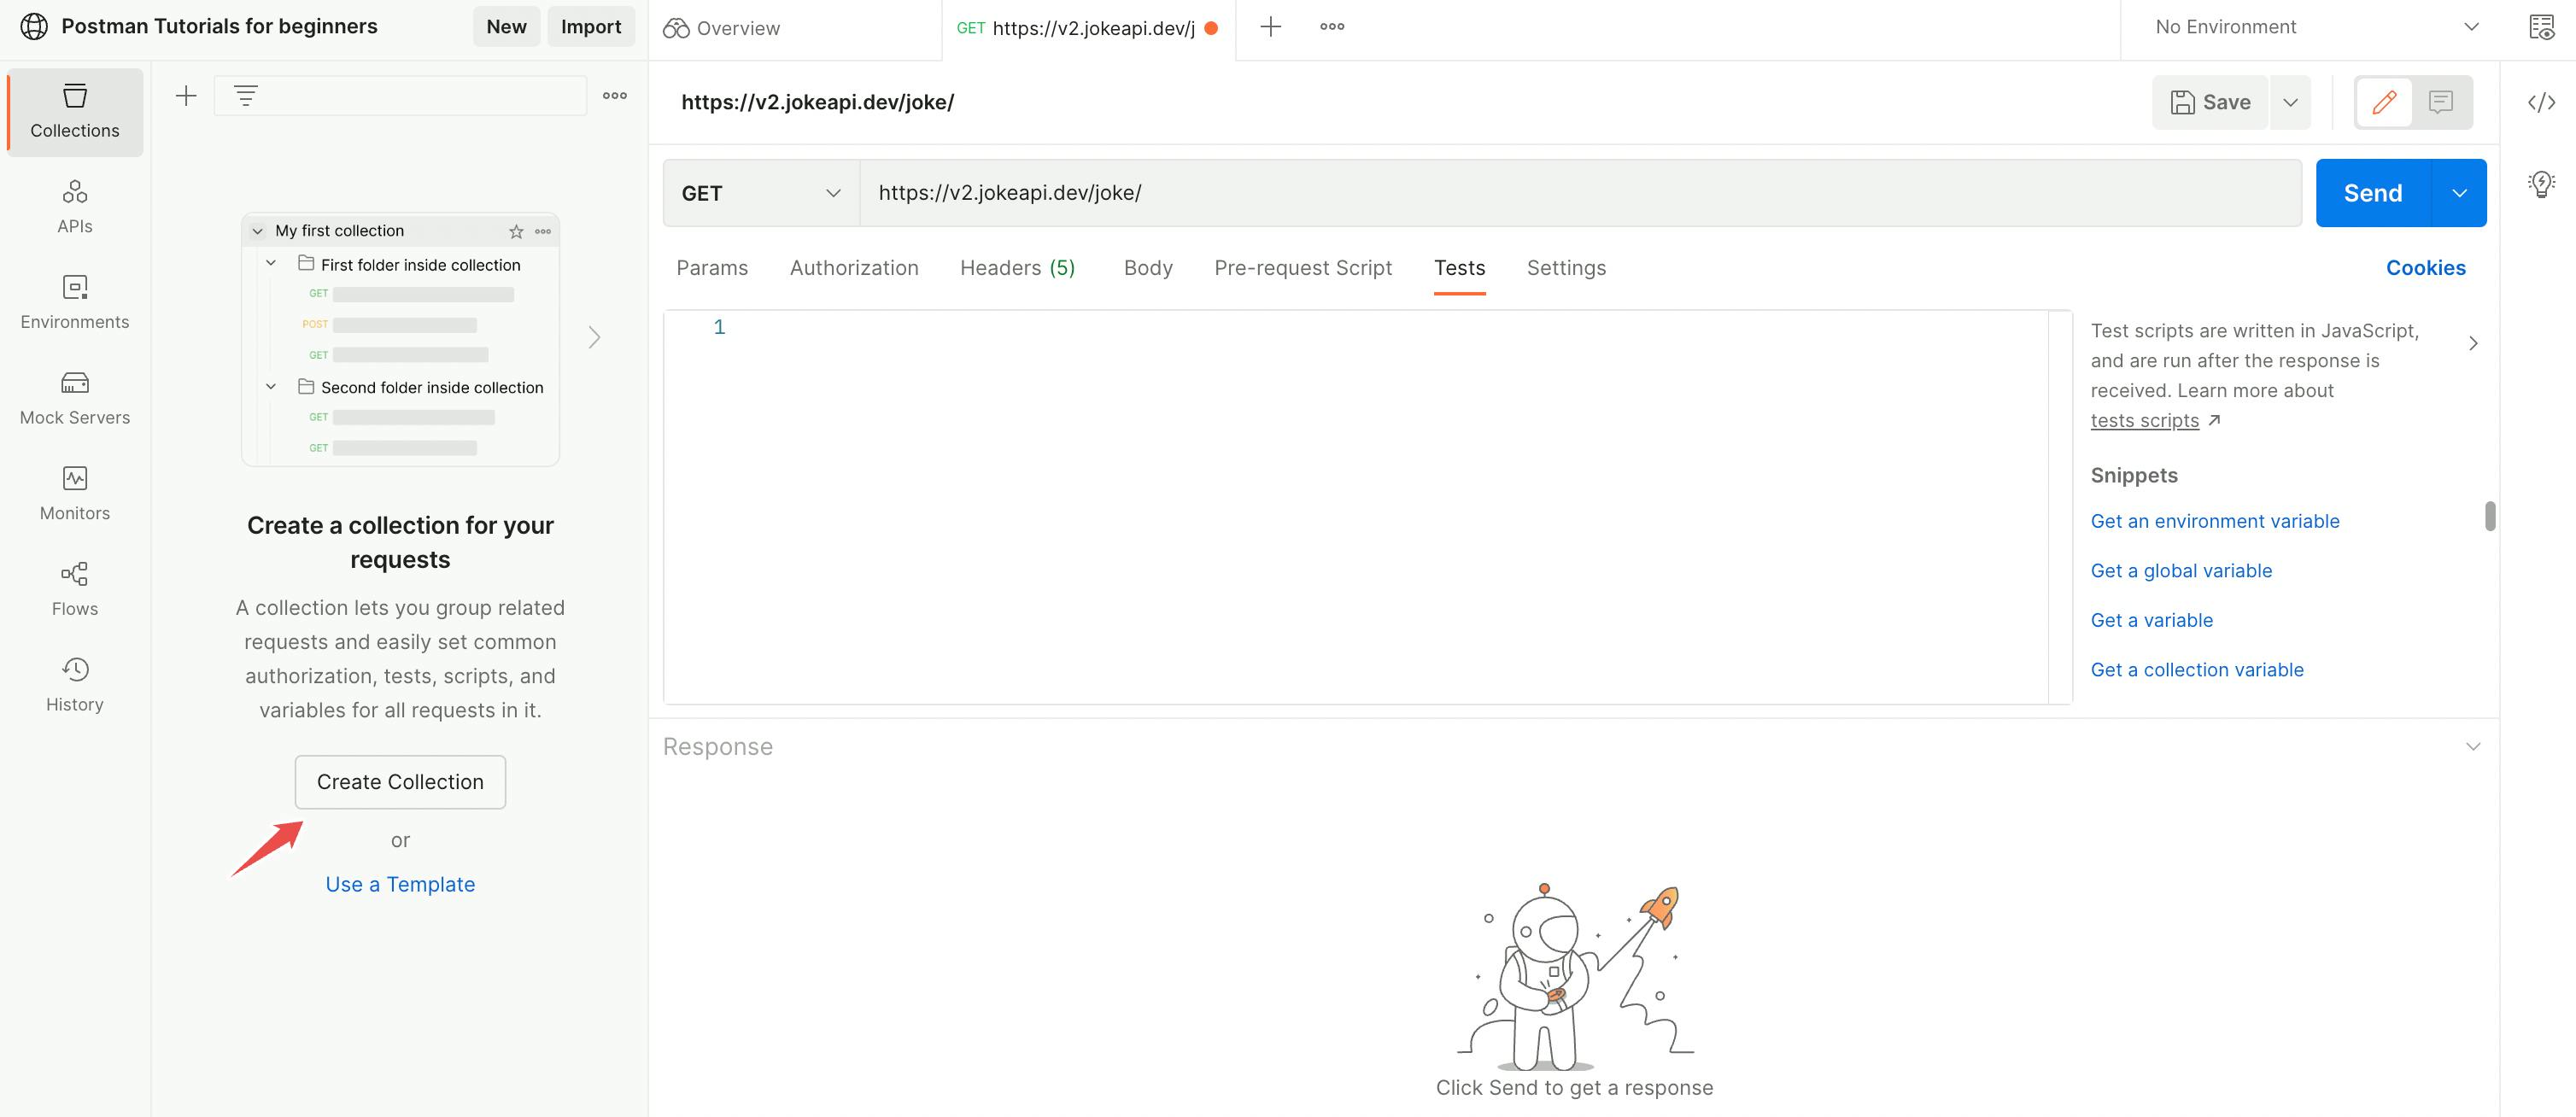
Click the New Collection button in the collections window's top left-hand corner.
Enter your collection name and click the Save button.
- Request
In Postman, a request is a message sent from the client to the server that contains information about the desired operation.
It can be sent using various methods, such as GET, POST, PUT, PATCH, DELETE, etc. The request includes a URL, headers, parameters, body, authorization, and tests.
Developers use Postman to create, send, and test requests to APIs and to organize and share them with team members.
This section will explain everything from Param, Authorization, and Header.
Param: Postman allows you to add parameters to your API requests. Parameters are key-value pairs that can be added to an API request's URL, query string, or request body. You can customize and refine your requests using parameters to get the desired response.

Authorization: Authorization is used to authenticate the user and ensure they have the necessary API permissions. Postman provides several authentication options, including basic authentication, OAuth, and API keys.

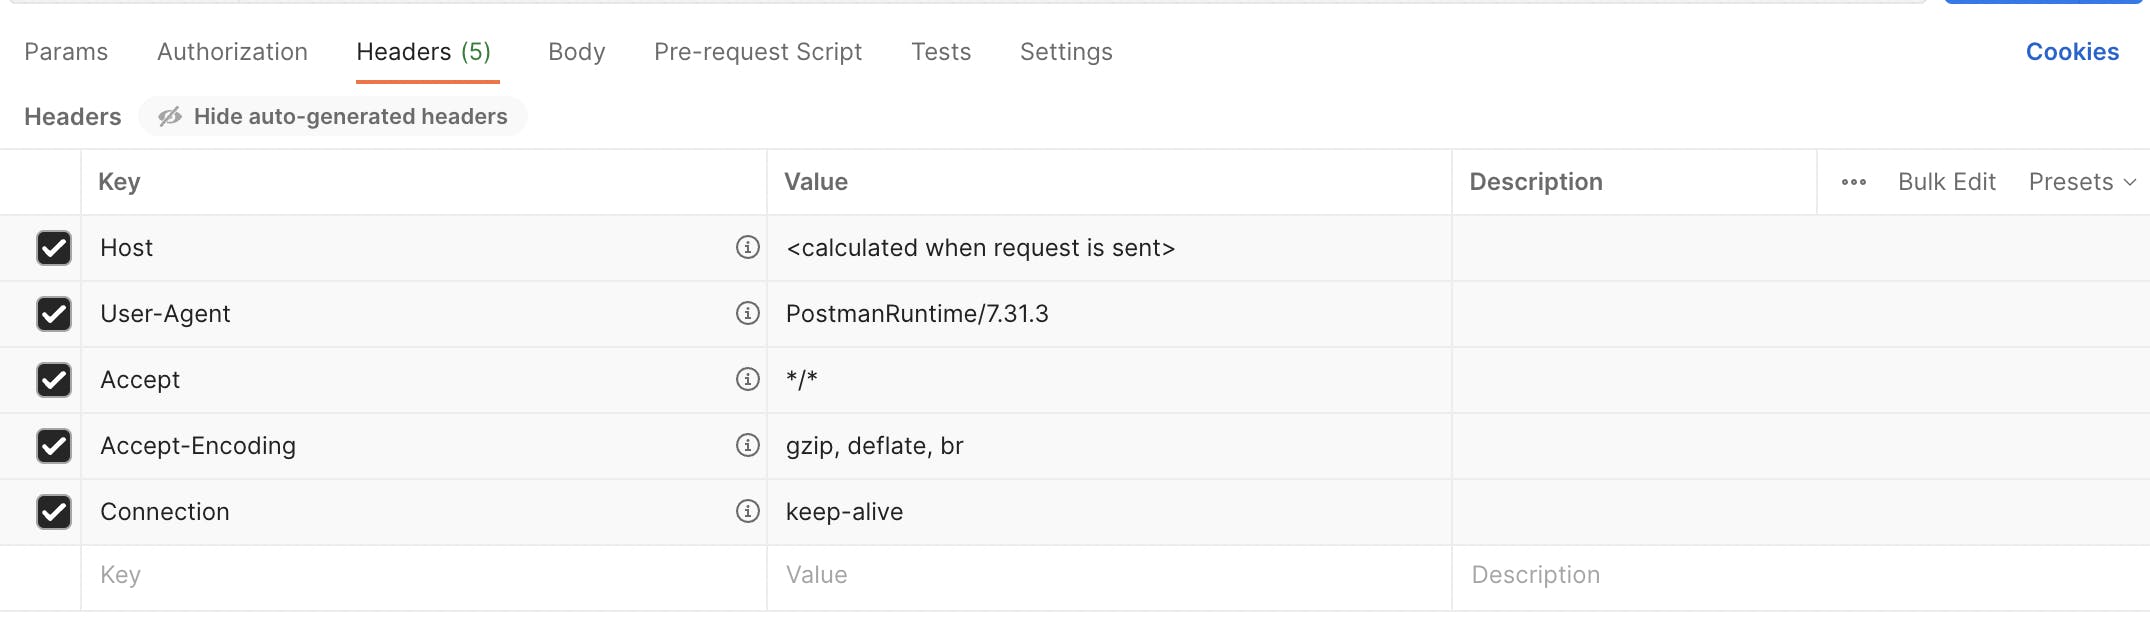
Header: Headers provide additional information about the request, such as the content type, encoding, and cache control. Postman allows you to add and customize headers to your API requests.
Body: The body of an API request contains the data sent to the server. Postman allows you to customize the body of your requests, including the format, content type, and data.

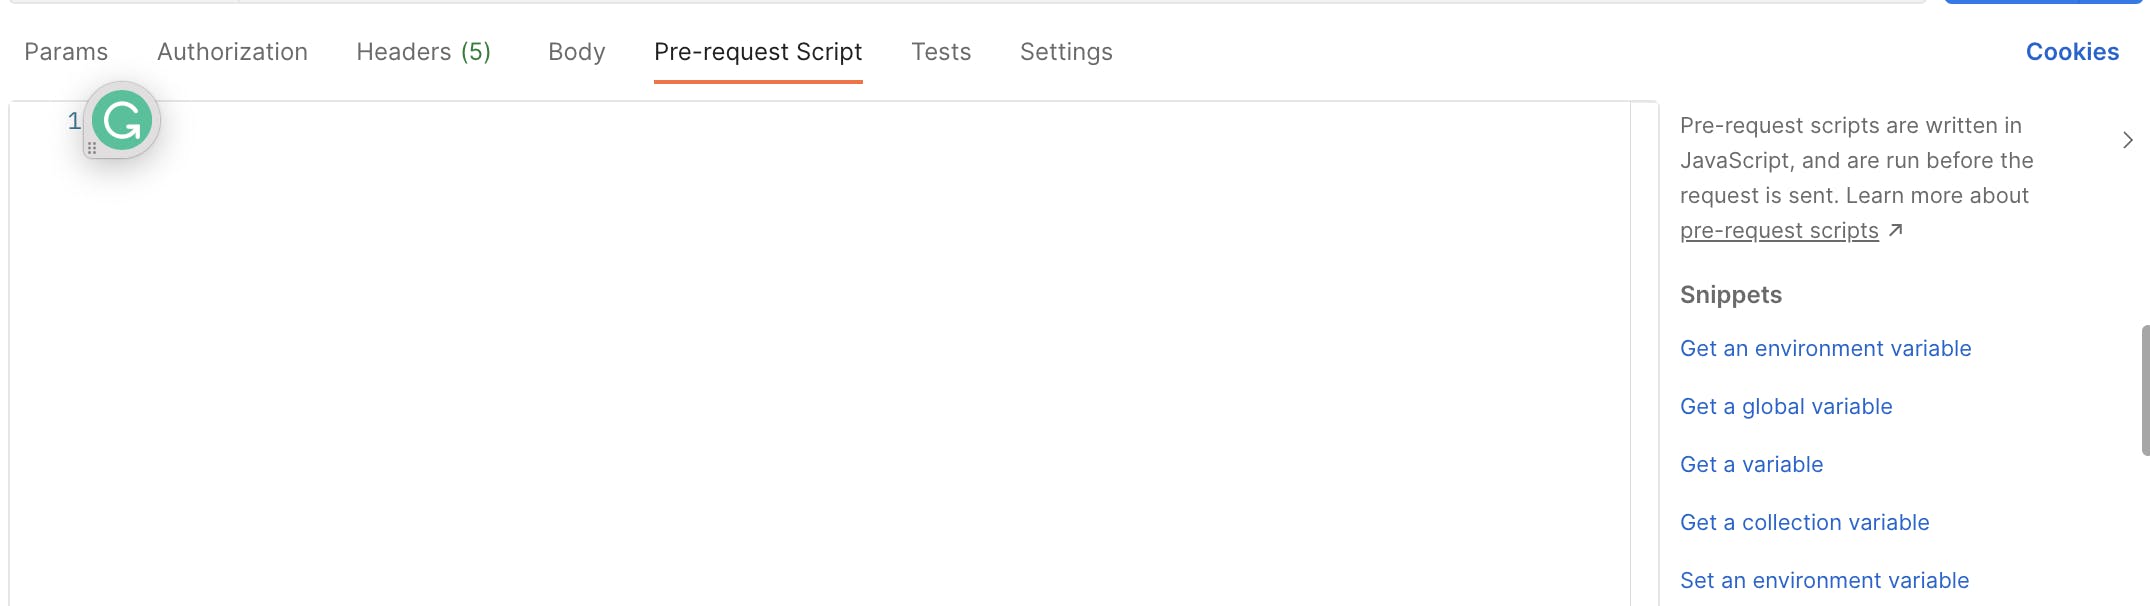
Pre-request script: Pre-request scripts are executed before an API request is sent. They are used to set variables, add headers, or perform other necessary actions to prepare the request. Postman allows you to write and execute pre-request scripts for each request.
Tests: Tests are scripts executed after an API request is sent. They validate the response and ensure that it meets the expected criteria. Postman allows you to write and execute tests for each request.

Settings: Postman has several settings that can be customized to suit your needs. These include Enabling SSL certificate verification, Automatically following redirects, Following the original HTTP Method, and more.

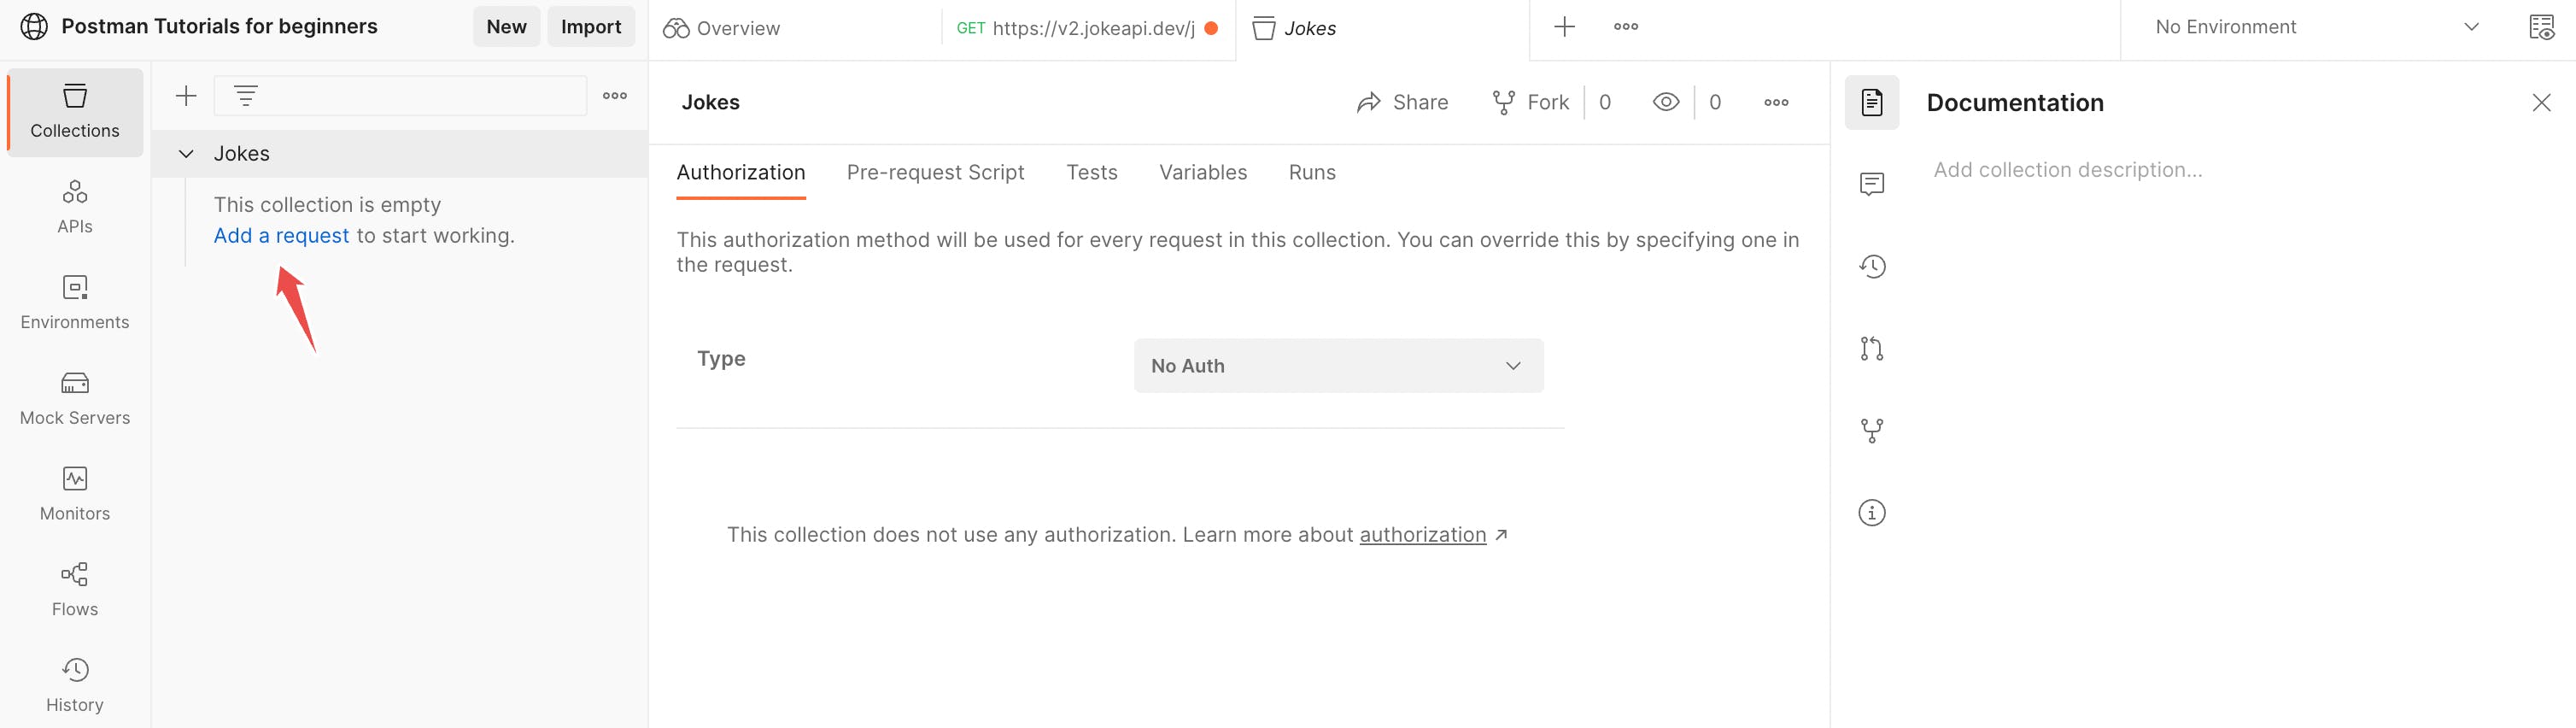
- Adding requests to collections
To add requests to your collection, click the Add a request in the top left-hand corner of the collections window.
Enter the request URL, select a method and any required headers or parameters, and click the Save button in the top right-hand corner of the request window below No Environment.

To add more requests to your collection, click the Add More Actions icon in the upper right corner of your current collection. This icon is easily recognizable, with a red arrow pointing toward it. This icon will reveal a dropdown menu with several options, including Add folder, Add Request, Create a fork, and more. Select "Add Request" to add a new request to your collection.
To view and edit the requests in your collection, click on the request name in the collections window.
Making HTTP requests using Postman
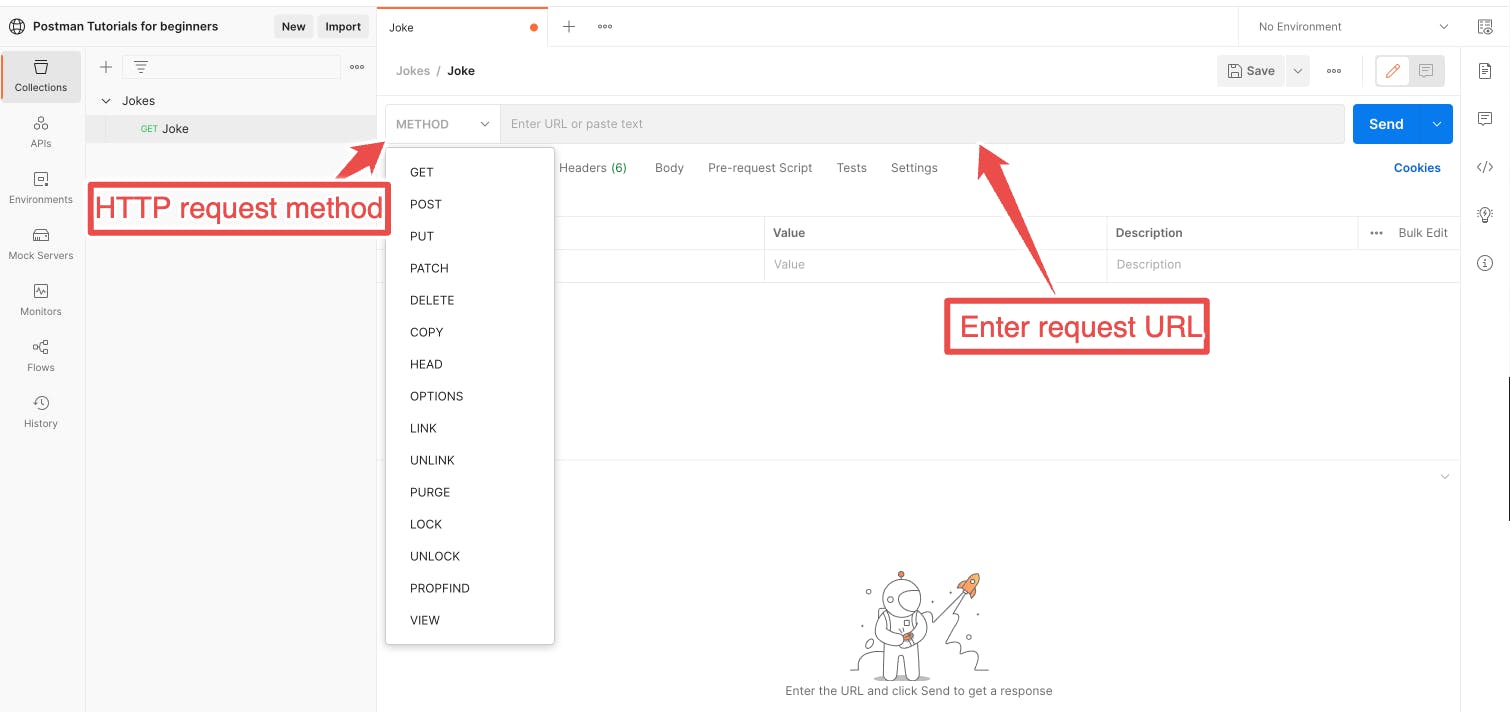
You can create a new request by selecting the appropriate HTTP request method (
GET, POST, PUT, or DELETE) from the dropdown menu.Enter the URL of the API endpoint you want to test in the "Enter request URL" field.
Add any required headers or parameters to the request by clicking the appropriate tabs below the URL field.
If your request requires a request body, click the "Body" tab and select the appropriate format (such as
raw text, JSON, or XML). Enter the request body in the text area provided.Click the Send button to send the request and view the response.
You can further refine your request by modifying the request headers, parameters, or body and sending the request again.
You have successfully made an HTTP request using Postman.
- Understanding the response
HTTP (Hypertext Transfer Protocol) response is the message sent by a server to a client in response to an HTTP request made by the client. The response contains a status line, headers, and, optionally, a message body.

Understanding the response in Postman is an essential part of API testing. Here's a simple instruction to help you understand the response:
After sending an HTTP request using Postman, the response will be displayed in the lower half of the window.
The first information you should look for is the response status code, which indicates whether the request was successful. The status code is a three-digit numeric code that indicates the result of the request, such as
200 OK(the request was successful),404 Not Found(the requested resource could not be found), or500 Internal Server Error(an error occurred on the server). The status message provides a more detailed description of the status code.The headers tab displays the headers included in the response. Headers can provide additional information about the response, such as content type, encoding, and length of the message body, as well as any cookies, caching directives, or authentication status.
The body tab displays the response body, which can be in various formats, such as
plain text, JSON, or XML. The response body contains the actual data returned by the API.You can also view the response time in the top right-hand corner of the response window. This indicates how long it took for the API to respond to your request.
Collections and Environments
- Environment variables
Postman environment variables are dynamic values in your API requests and scripts to simplify and streamline your testing and development processes.
To create environment variables in Postman, follow these simple steps:
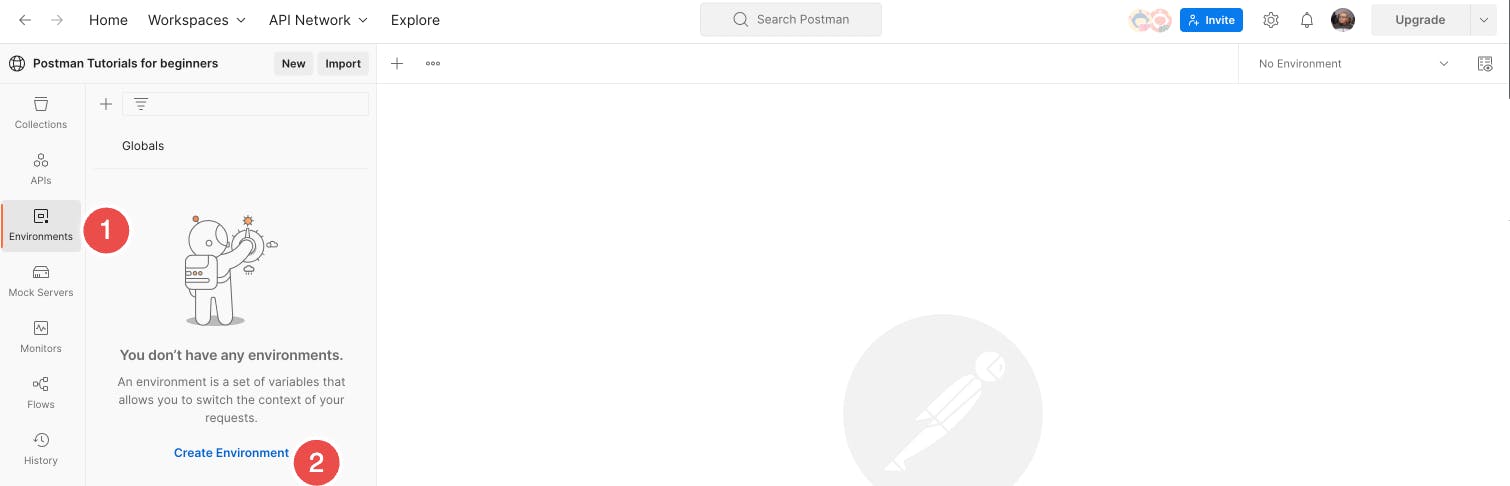
Click the Environments button in the top right-hand corner.
Click on the Create Environment button to create a new environment.
Enter your environment's name and press enter button.
Enter a variable name, select a type (secret or default), and enter an Initial and current value.

Click on the Save button to save your environment.
To use your environment variables in your requests, reference them using double curly braces. For example, if you defined a variable called "base_url,” you can reference it in your requests as
{{base_url}}.
- Using global and collection-level variables
Postman allows you to define and use variables at different levels, including global and collection-level variables.
Global variables can be accessed across different collections and requests, while collection-level variables are specific to a particular collection.
The steps to create global and collection-level variables in Postman:
Click the " Environments" button in the top right-hand corner of the application.
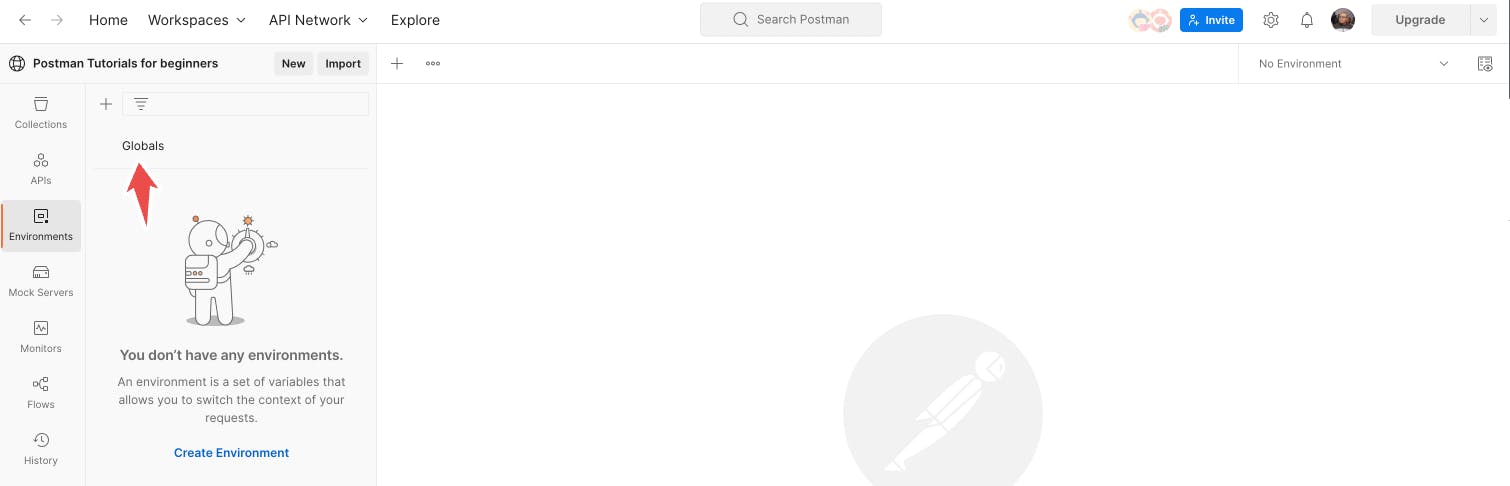
Click on the Globals text to create global variables, or click on a collection to create collection-level variables.
Enter a variable name, select a type (
secretordefault), and enter an Initial and current value.Click on the Save button to add a new variable.
To use your variables in your requests, reference them using double curly braces. For example, if you defined a variable called "base_url,” you can reference it in your requests as
{{base_url}}.
A global and collection-level variable in Postman allows you to manage and reuse values across your requests and collections easily.
Mock servers and Monitors
- Mock servers
Postman mock server is a feature that allows you to simulate a back-end server and create a fake API response for testing purposes.
The steps to create a mock server in Postman:
Click on the Mock Server.
Click Create Mock Server.

Enter the request you want to mock.
You will fill in the following fields:
Request method: Select the request method (
GET, POST, PUT, DELETE) You want to mock them and set their details.Request URL: Add the request URL you want to mock and set their details.
Request Code: Add the response code (
200,400,501) You want to mock them and set their details.Response Body: Add the responses you want to mock and set their details.
To add more options, click the three dots menu button close to the Response body.

Create a new collection to mock to select an existing collection, then configure it.
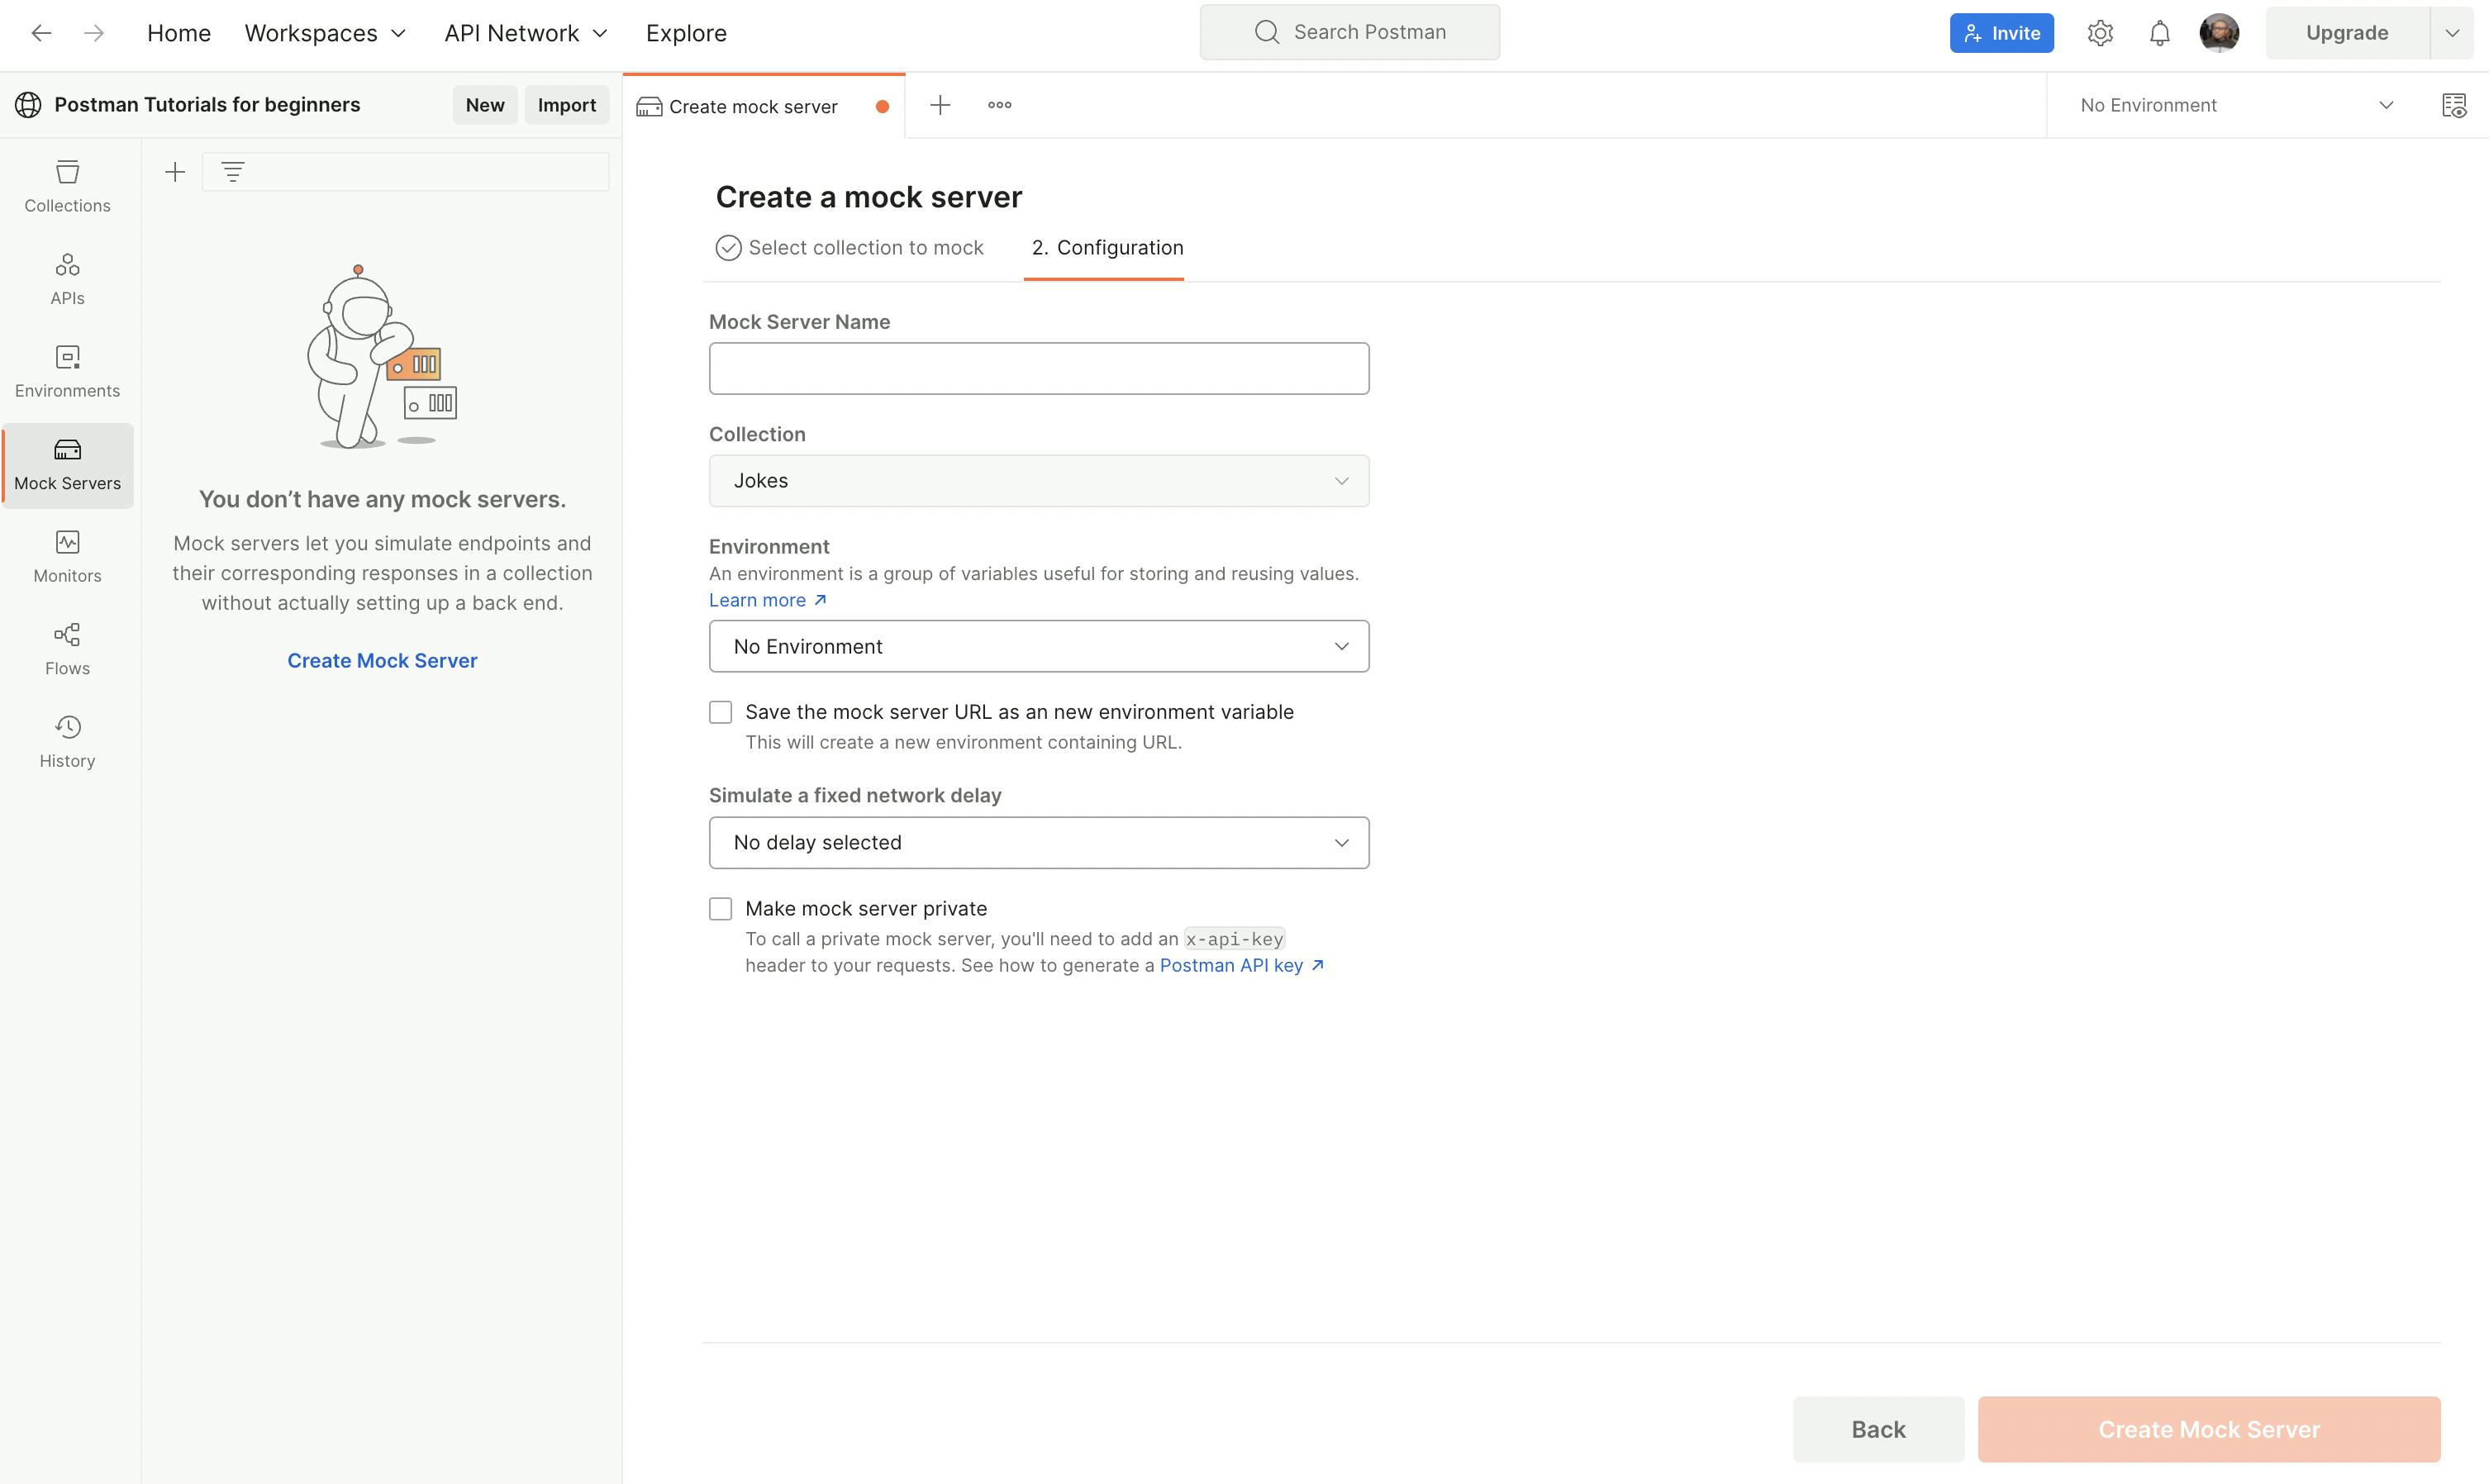
Choose a mock server name, and select an environment you want to use for your mock server.
Start the mock server by clicking the "Start Mock Server" button.
Once you've created a mock server in Postman, you can test your application or API by sending requests to the mock server URL.
The mock server will then respond with the predefined responses you've set up, allowing you to test your application's behavior in different scenarios.
- Monitors
Postman Monitors is a feature that allows you to schedule API tests to run automatically at a given time interval.
It can be useful for checking API uptime, response time, and overall performance.
The steps to create a monitor in Postman:
Select Monitor.
Click Create a Monitor.

Choose a name for your monitor.
Select the environment to store the variables you want for your monitor.
Set the frequency at which you want to run the monitor.
Save the monitor and start it.
Once you've created a monitor in Postman, it will automatically run at the frequency you set up, and you will be provided with each run's results via email.
Flows and History
- Flows
Postman Flows is a feature that allows you to create and automate multi-step workflows that involve API requests, tests, and scripts.
It can be useful for testing complex business logic or integrating it with other services and systems.
The steps to create a flow in Postman:
Select Flows from the left-hand menu.
Click Create Flow.

Choose a name for your flow and add a block from the collection that contains the requests and scripts you want to use.
Select the actions you want to perform in response to the (e.g.,
Send Request, Delay, If logic, or set a variable).Save your flow and run or Deploy it to the cloud.

Once you've created a flow in Postman, you can use it to automate complex workflows involving multiple API requests, tests, and scripts.
You can also set up alerts and notifications to keep track of the flow's progress and any errors or issues that arise.
History
Postman History is a feature that allows you to view a list of all the API requests and responses you have sent and received using the Postman app.
It provides a convenient way to keep track of your testing and development activities and to review and troubleshoot issues that may arise.

When you send an API request in Postman, it automatically becomes part of your history.
You can view your history by clicking on the "History" button in the left-hand menu of the Postman app.
From there, you can see a list of all your past requests, including the date and time they were sent, the request method and URL, and the response status code and body.
You can filter your history using the search bar. You can also use the history to quickly repeat or modify previous requests or export data for analysis or reporting purposes.